Send a Prescription Order to a Pharmacy via LifeFile
The following tutorial demonstrates how to use a Trigger, a Condition, and an Adapter to automate the process of sending of a prescription order to a specific pharmacy partner that uses the LifeFile platform.
This workflow automates the crucial step of sending a completed prescription order to your fulfillment partner. By using a condition, you can create a single workflow that routes orders to the correct pharmacy based on how the order was assigned.
Workflow Overview
This automated workflow consists of three main steps. However, you can expand it to match different numbers of pharmacies. Here’s a quick look at what you'll build:
Trigger: The workflow starts when a prescription has been approved and is ready to be fulfilled.
Condition: Next, a Condition step acts as a router, checking which pharmacy the order has been assigned to.
Adapter: If the assigned pharmacy matches the condition, the system sends the complete order and prescription details to that specific pharmacy’s LifeFile system.
The Condition/Adapter pattern can be repeated for each of your pharmacy partners, creating a powerful order routing system within a single workflow.
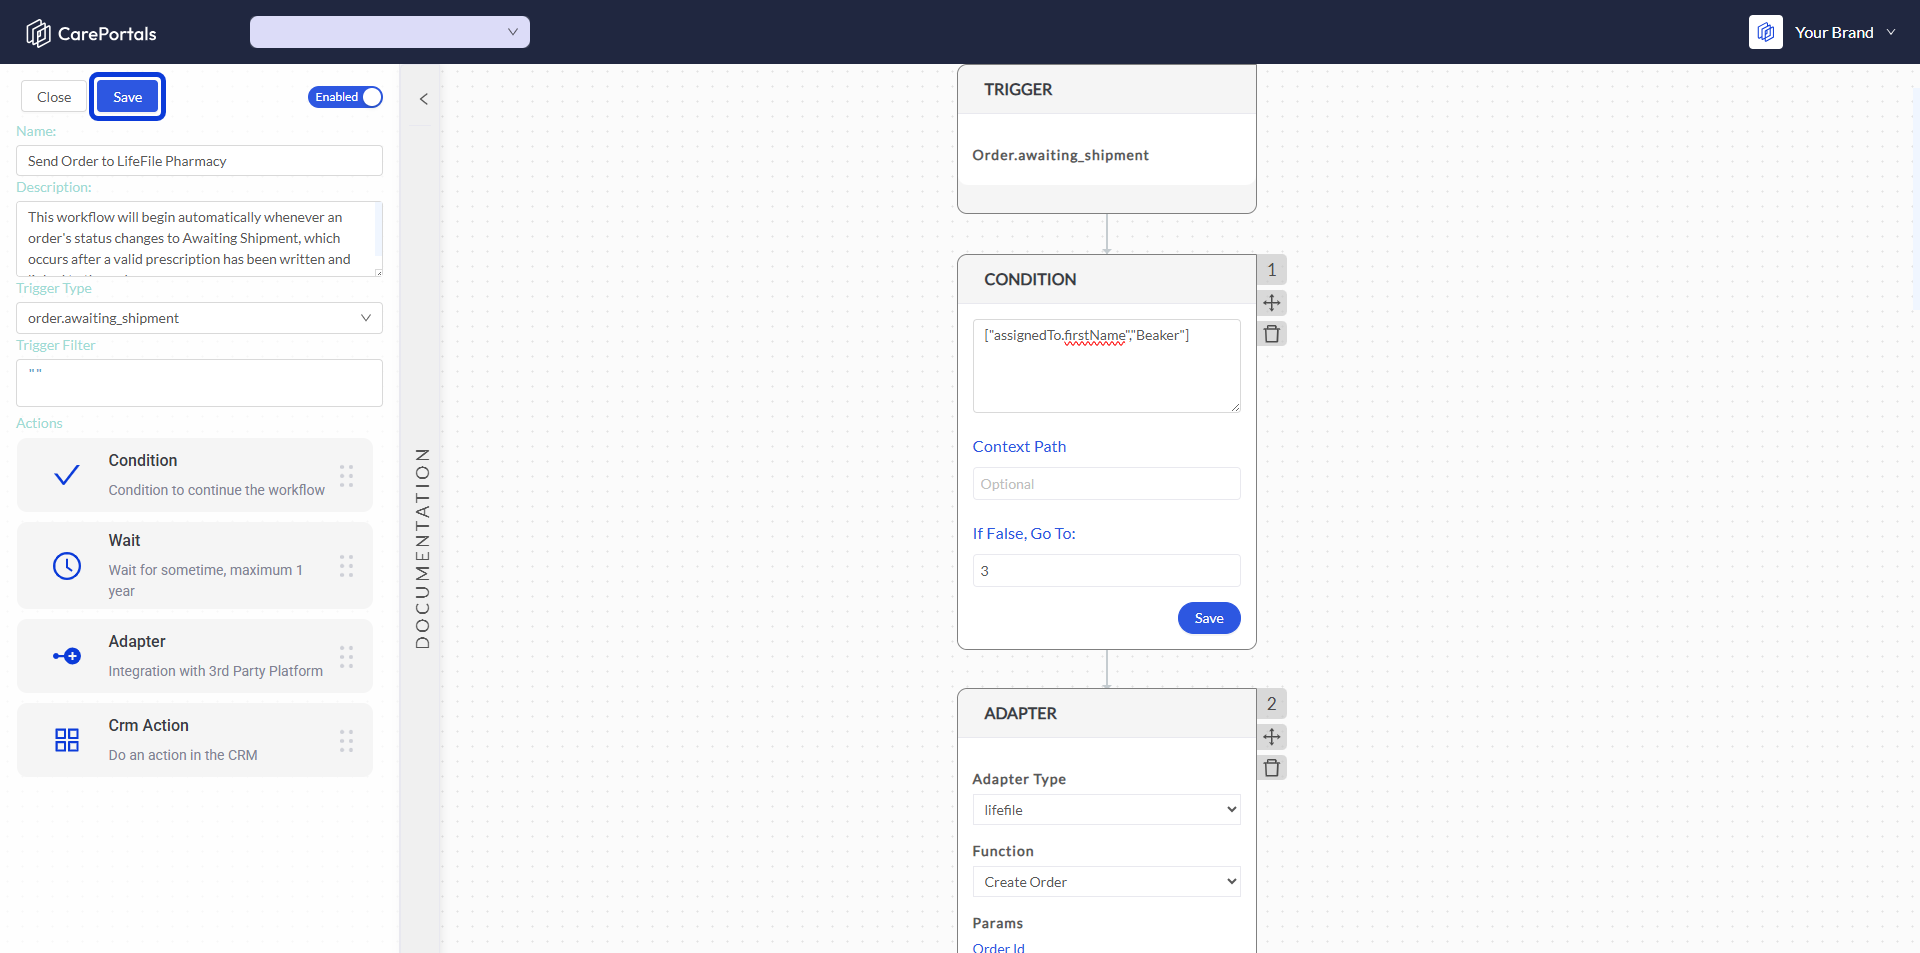
Step 1: Set the Trigger
Create a new workflow by navigating to CRM Portal > Admin > Workflows > Create Flow.
Add a Name (e.g., "Send Order to LifeFile Pharmacy") and set the Trigger Event as
Order.awaiting_shipment. This workflow will begin automatically whenever an order's status changes to Awaiting Shipment, which occurs after a valid prescription has been written and linked to the order.Click on OK to save your workflow. Then, open it to begin the building process.

Step 2: Check for the Correct Pharmacy (Condition)
This step ensures that the order is sent only to the intended pharmacy. You will add a Condition that checks which pharmacy, registered as a user, is assigned to the order. The workflow will only proceed if the assigned pharmacy's name matches the one you specify.
Setup Instructions:
Add a Condition step to your workflow after the trigger.
Configure the fields as described below:
In the main Condition input field, enter the check for the pharmacy's name. For example:
["assignedTo.firstName","Beaker"].In the If False, Go To: field, enter the number of the next step that should run if this condition is not met (e.g.,
3). This allows you to check for another pharmacy.
Understanding This Configuration
This setup creates a rule that checks if the order is assigned to the correct pharmacy.
The path
assignedTo.firstNametells the step to look at the first name of the user assigned to the order. In CarePortals, pharmacies are set up as users.The value
"Beaker"checks if the assigned user's first name is exactly "Beaker".This creates the following logic:
If the assigned user's first name is "Beaker," the condition is TRUE, and the workflow proceeds to send the order to LifeFile.
If the assigned user's first name is anything else, the condition is FALSE, and the workflow jumps to the step number you entered in the If False, Go To: field. This prevents orders from being sent to the wrong fulfillment partner.
Step 3: Send the Order to LifeFile (Adapter)
This step runs only if the condition is met. It uses an integration with LifeFile in an Adapter step to send all necessary order and prescription details to the pharmacy's management system, allowing them to begin the fulfillment process.
Setup Instructions:
Add an Adapter to your workflow after the Condition step.
Configure the adapter's primary settings:
Adapter Type: Select
LifeFilefrom the list.Function: Select
Create Order.
In the Parameters section, you will map the data from the CarePortals order to the fields required by the LifeFile API. This will also include authentication details like a URL, username, and password provided by the pharmacy.
Here is an example of how you might map some of the fields:
This configuration securely sends the complete order details to the LifeFile system, allowing the pharmacy to prepare the product for shipment.
Remember to click Save when you finish editing your workflow. If your workflow is Enabled, it will start running.
Step 4: (Optional) Add Multiple Pharmacies to the Workflow
You may work with multiple pharmacies. You can expand this workflow to handle each one by chaining conditions and adapters.
For example, you can add a new condition step after the first adapter. This new condition would check for a different pharmacy, such as "Strive." The Condition would be:
["assignedTo.firstName","Strive"]
If this condition is true, the workflow proceeds to another Adapter step configured with Strive's unique LifeFile credentials. If it is false, the workflow can move to another condition to check for the next pharmacy. This creates a powerful routing system within a single workflow.
How Pharmacy Priority Works
While the workflow uses a sequence of conditions to route an order, the actual prioritization of which pharmacy gets assigned happens before the workflow begins.
This priority is configured at the product level in the Store Manager. A list of preferred pharmacies is added to a product's Extras field.
When a patient places an order, the system reviews this list in order. It assigns the order to the first pharmacy in the list that can ship to the patient's State (CA, CT, etc.). The workflow then uses this assignment to route the order to the correct fulfillment partner.
Next Steps
If you are interested in learning how to create other types of workflows, you can check the following guides.
How to Build a Workflow to Send an Email: Learn how to build an automated workflow to send an email.
Send a Slack Notification for New Patients Workflow: Learn how to use webhooks to connect to other platforms.