The Workflow Automation Engine
The Workflow Automation Engine is a core component of the CarePortals platform. It functions as an intelligent assistant, enabling you to streamline the patient journey and manage communications effectively.
Using a no-code, drag-and-drop builder, you can design fully customized clinical and operational workflows. This empowers teams to automate processes, reduce manual effort, and ensure consistent execution across your workflows.
What's a Workflow?
A workflow is a sequence of automated actions that starts with a specific event, a trigger, such as when a new order created or a subscription renewed.
With this tool, you can customize every aspect of a workflow, from its triggers to the actions it performs. This helps you streamline your operations, create time delays between actions, and scale your business as it grows. While we set up your initial workflows, our goal is to empower you to make changes to workflows and create new ones whenever you need to.
The Components of a Workflow
Every workflow is built by combining different components in the visual builder. Think of them as building blocks that you connect to create an automated process. Here are the main components you will use:
What is a Trigger?
A Trigger is the specific event that starts a workflow, such as order placed, questionnaire submitted, patient account created, or subscription cancelled. When that specific event occurs, the workflow is automatically activated, if enabled.
The platform offers a wide variety of triggers. To learn more about them, read the Workflow Events/Trigger reference guide.
A Trigger Filter is an optional feature that allows you to make your trigger more specific. Without a filter, a workflow might activate for every single single order, for example. By adding a filter, you can ensure the workflow only runs when your exact criteria are met.
Access the How to Configure a Trigger with Filter guide to learn how to configure and use Trigger Filters.
Consider these use cases for trigger filters:
Activate a workflow for specific products: Run a workflow only for orders that include a certain product, such as 'Semaglutide'.
Process webhooks from specific partners: If you receive automated updates (webhooks) from multiple systems, you can filter them by their source. The workflow below will only run if the webhook comes from either
lifefileorsevencells, which is useful for routing updates from different pharmacy partners.Route state-specific visits: Use the trigger filter to send visit requests to your physician network partner only for patients in selected states.
Whenever the trigger is activated, a payload is created. To learn more about payloads, read the Trigger Events Payload Index reference page.

What is a Condition?
The Condition component allows you to split the workflow into multiple paths based on rules you define. It decides which path to follow by evaluating if a condition is true or false. You can specify what happens if the condition is true and which step the workflow should jump to if it is false. If the false path is left blank, the workflow will end as it will use “Exit” (the workflow) as its default value.
Conditions must be written in JSON criteria, which follows MongoDB conventions. To gain a deeper understanding of how they work, read the How to Use Conditions article.

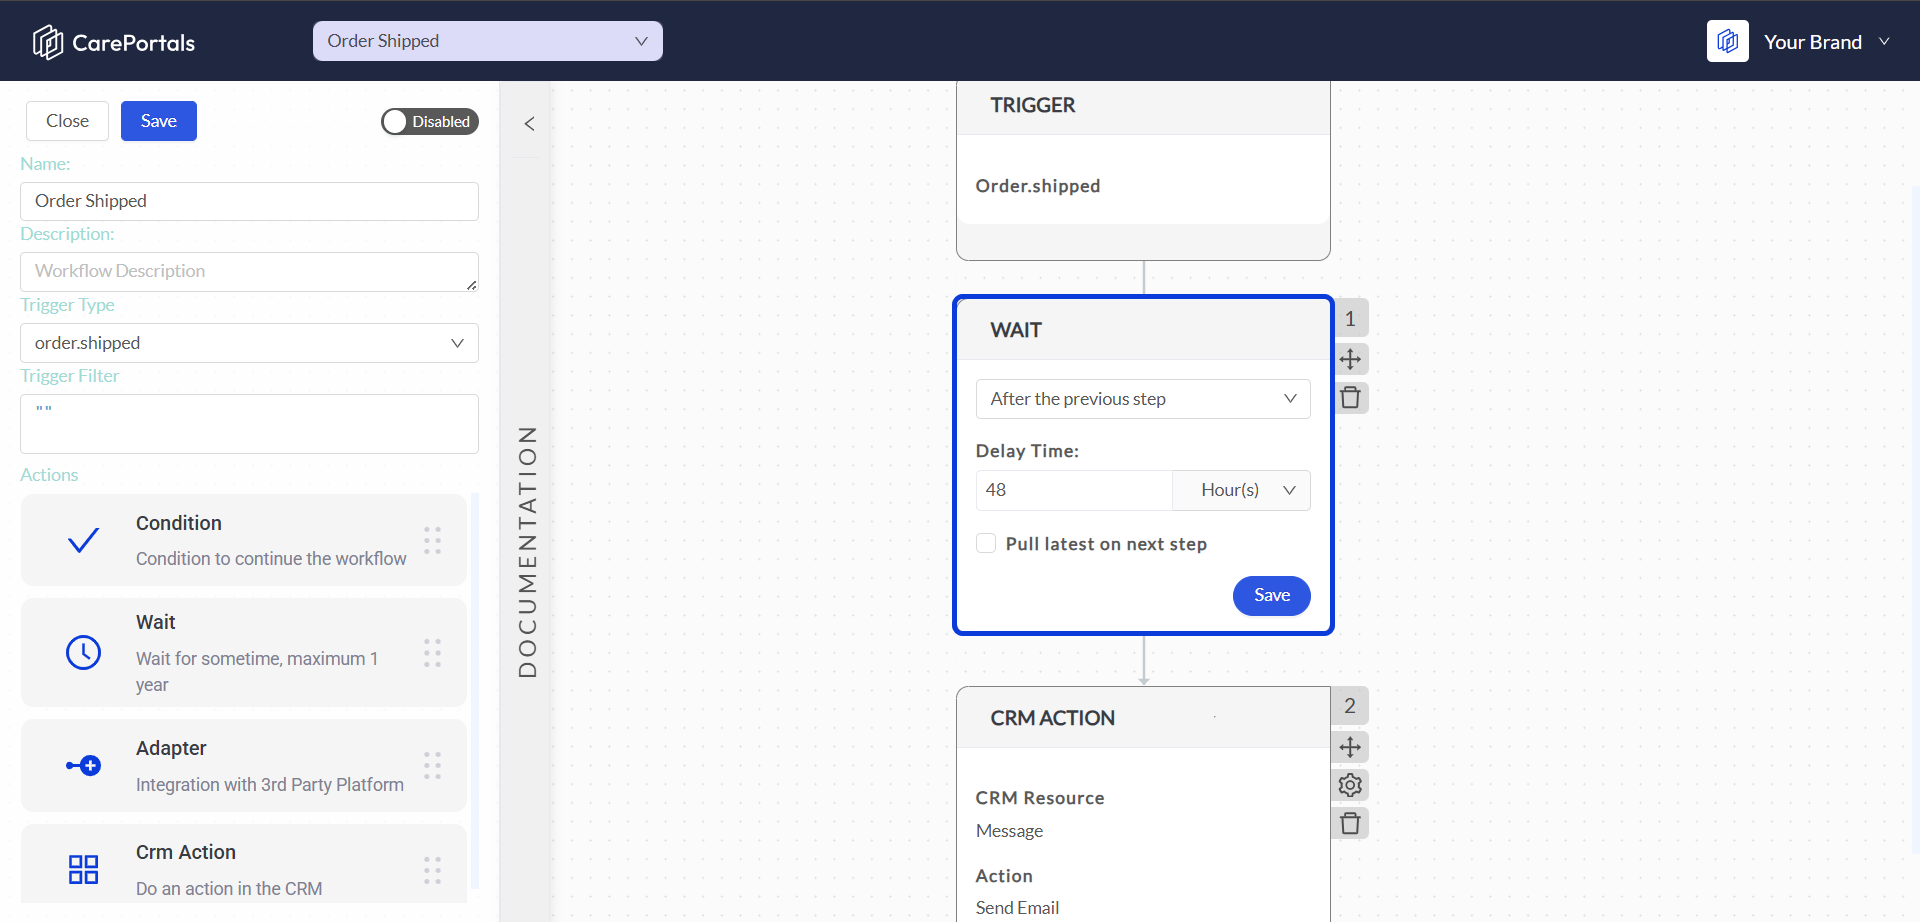
What is a Wait Component?
The Wait component lets you create waiting periods within your workflow. This is useful for timing your actions. For example, you could wait 48 hours after an order is shipped before sending a follow-up email. This helps you manage sending notifications effectively.
You can set wait times in these ways:
Time variable: Sets a time based on when the workflow was triggered or when a previous action with a date variable was executed.
After the previous step: Sets a time that depends on the action immediately before it in the workflow.
Specific date/time: set a particular date and time for the action to take place.
To get a deeper understanding on how this component and its features work, refer to the How to Use the Wait Component article.
What is an Adapter?
The Adapter is your gateway to connecting CarePortals workflows with the external, third-party tools your business relies on. Think of it as a bridge that allows CarePortals to communicate with other platforms.
This enables you to automate powerful actions like processing payments with Stripe, subscribing leads to a list in Klaviyo, or updating your CRM in HubSpot, all from a single workflow.
Consider these use cases for Adapters:
Connect to a provider network like Beluga to automatically send a visit request when an order is ready for a prescription.
Send an order and its prescription to a pharmacy’s system, like LifeFile, for fulfillment.
Subscribe new patient to a marketing platform like Klaviyo or HubSpot when they sign up.
After you select the Adapter Type, you choose a specific Function to perform. Each Function has its own required parameters that you need to fill in. Some actions also have an extra section for more advanced settings.
To learn more and see a list of all the different adapters that can be integrated along with their functions, refer to the How to Use Adapters article.

What is a CRM Action?
This component allows you to perform tasks directly within the CarePortals platform, using its internal resources, including orders, subscriptions, questionnaires, messages, and customers.
You can automate actions like changing an order status, sending an email, or updating a patient's record. The actions are grouped into categories. Each action has its own settings, and some include an 'Extras' section where you can add custom data using JSON for more specific needs.
To learn more about the different actions available, refer to the Available CRM Actions reference guide.

Putting It All Together
These components work together to automate complex processes. Here is a real-life example of a workflow that reminds patients to complete their pending order requirements.
Trigger: The workflow is activated when an order's status changes to
order.awaiting_requirements. This typically indicates that the order is pending requirements like an ID or an intake form.Wait: The workflow waits for one hour. This gives the patient time to submit their information without receiving an immediate reminder. The
Pull latest on next stepoption ensures the workflow has the most current order information before proceeding.CRM Action (Check Requirements): After the wait, a CRM Action runs the
Check Has Requirementsfunction to verify if the patient has submitted all necessary forms for their order.Condition: Checks the result of the previous step.
If the result is
true(meaning requirements are still pending), the workflow continues.If
false(meaning the patient has completed the forms), the workflow exits (since its field was left blank).
CRM Action (Send Email): If requirements are still pending, a final CRM Action sends a reminder email to the patient.
For a workflow to be active and start running, it needs to be enabled. After saving your work, click the toggle switch at the top of the editor until it turns blue and displays Enabled.
Next Steps
To learn more about each workflow feature, we recommend you to go through the following pages:
Workflow Events/Triggers: Learn how to start workflows based on events in the platform.
How to Use Adapters: Connect your workflow to external services and perform specific actions.
Available CRM Actions: Add CRM Actions like sending messages or updating records.
How to Use the Wait Component: Add delays to control when actions happen within a workflow.
How to Use Conditions: Create logic paths by setting rules that split your workflow’s behavior.