How to Send a Webhook Using Workflows
Connecting CarePortals to the tools your team uses helps keep everything in sync. A great way to do this is with webhooks. A webhook acts as a real-time update that notifies an external system whenever a specific event occurs, such as a change in an order's status or a patient starting the checkout process.
This guide shows you how to set up and send a webhook using the Workflow Automation Engine. This will enable you create powerful automated connections between your tools and CarePortals.
Workflow Overview
The workflow would typically consist of two main components. It is designed to send real-time data from CarePortals to any 3rd-part platform or service that can receive webhooks.
Here’s a quick look at what you will build:
Trigger: The workflow starts when a specific event happens in CarePortals, such as an order being created (
order.created) or a patient signing up (customer.signup).Adapter: The Webhook Adapter is then used to send a custom payload of data from that event to a specified URL. This creates a direct, real-time connection to your other tools.
By mastering this pattern, you can connect CarePortals to countless other platforms, from communication tools like Slack to custom analytics dashboards.
Step 1: Open the Workflow Builder
Access the workflow builder in your CRM Portal and follow these steps:
Navigate to Admin > Workflows in the side menu.
Click Create Flow to start a new workflow, or select an existing one to edit it.
Step 2: Choose a Trigger
A Trigger is the specific event that starts your workflow. For sending a webhook, some of the most frequently used triggers are:
order.createdcart.checkoutcustomer.signup
Select the trigger that matches your needs. For this example, we will use order.created.
See a complete list of all available events in the Workflow Events/Triggers guide.
Step 3: Add the Webhook Adapter to the Workflow
The Adapter component is used to connect your workflow to external platforms.
From the Actions panel on the left, drag the Adapter component onto the workflow canvas.
In the configuration panel that appears, select Webhook from the list of adapters.
From the Function dropdown, choose Send Event (mapperFn). This function allows you to configure and send the webhook request.
We recommend using the Send Event (mapperFn) function instead of Send Event. The mapperFn function gives you full control to build a custom request body, allowing you to choose exactly which data from the trigger event you want to send.
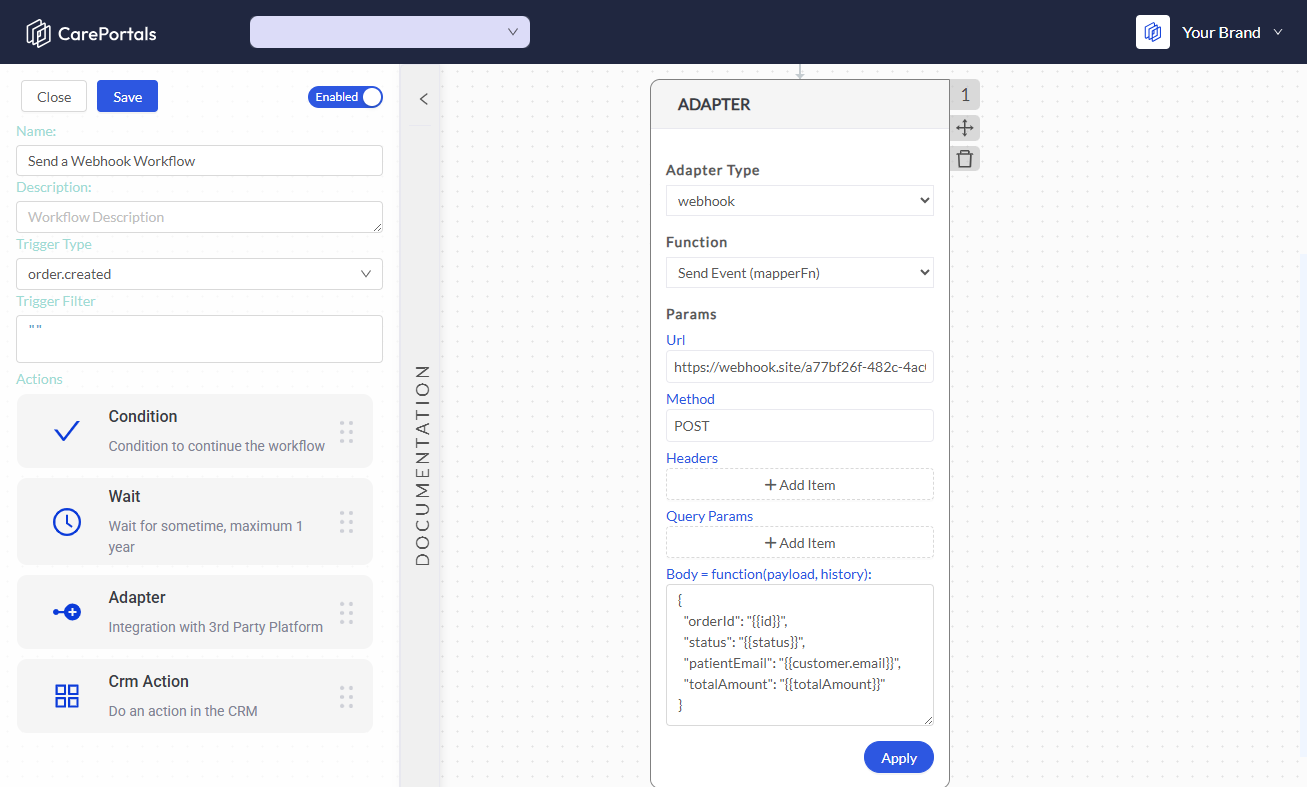
Step 4: Configure the Webhook
Fill out the webhook parameters:
Webhook URL: Paste the URL of the external system where you want to send the data.
Method: Choose the HTTP method for the request. The options are
POST,PUTorGET.Headers (Optional): Add any custom headers your external system requires, such as
Authorizationfor security tokens orContent-Typeto specify the payload format.Body: Enter the data you want to send in JSON format. You can use dynamic variables from the trigger's payload to include specific information from the event. Variables are enclosed in double curly braces, like
{{variable_name}}.
For example, if your trigger is order.created, the body could look like this:
Examplereturn {
orderId: payload.id,
status: payload.status,
patientEmail: payload.customer.email,
totalAmount: payload.totalAmount
};The variables available depend on the trigger you select. To see all the data available for each trigger, refer to Trigger Events Payload.
Step 5: Save and Enable Your Workflow
Once you have configured the webhook:
Click Save to keep your changes.
Make sure the Enabled toggle at the top of the workflow builder is on.
Your workflow is now active and will send a webhook whenever the trigger event occurs.
Test Your Webhook Before using your webhook in a live workflow, it is a good practice to test it to ensure it is configured correctly. You can use a free online tool like https://webhook.site to inspect the data your workflow sends.
To test it, copy the unique URL provided by the tool and paste it into the Webhook URL field in your workflow's configuration. When the workflow is triggered, you will see the exact payload that was sent, allowing you to confirm that your variables and JSON structure are correct.
Next Steps
Now that you know how to send a webhook, you may want to explore other workflow capabilities to build more advanced automations.
How to Use Conditions: Create different paths in your workflow based on specific rules.
How to Use the Wait Component: Add delays to control when actions happen.
Send a Slack Notification for New Patient Messages Workflow: See a practical example of using webhooks to send notifications to Slack.