Klaviyo Integration Guide
Integrating Klaviyo with CarePortals enables event-based workflows and data synchronization from CarePortals.
You can use these events in Klaviyo to build automated messaging flows based on actions that occur in CarePortals (for example, when a patient signs up, places an order, or completes another defined action).
A typical CarePortals–Klaviyo setup looks like this:
Signup (one-time): Add the customer to a Klaviyo list using the subscribeToList function.
Ongoing event tracking: Send all other relevant CarePortals actions to Klaviyo as events using the sendEvent function.
This approach keeps list subscription separate from behavioral event tracking and is the standard setup for most Klaviyo integrations with CarePortals.
Prerequisites
Before you can configure the workflow in the CRM, you must enable the integration on your account. To do this, you need to get your Public API Key and Private API Key from your Klaviyo account.
Once you have these keys, please provide them to our support team. We will handle the backend connection for you.
Build a Klaviyo Workflow
Once our team confirms the integration is active, you can use the Workflow engine to automate sending specific data events to Klaviyo when defined triggers occur in CarePortals.
Follow these steps to configure your workflow:
1. Create a New Workflow or Edit an Existing One
Navigate to the Workflows section in the CRM Portal. You can either create a new workflow or select an existing one where you want to add the Klaviyo event.
2. Define the Trigger
Select the Trigger Type that will initiate the action. For example, you might choose customer.signup to trigger an event whenever a new patient creates an account via the Patient Portal.
3. Add the Adapter Action
In the workflow builder, add a new step and select Adapter.
Adapter Type: Select Klaviyo from the dropdown menu.
Function: Select sendEvent.
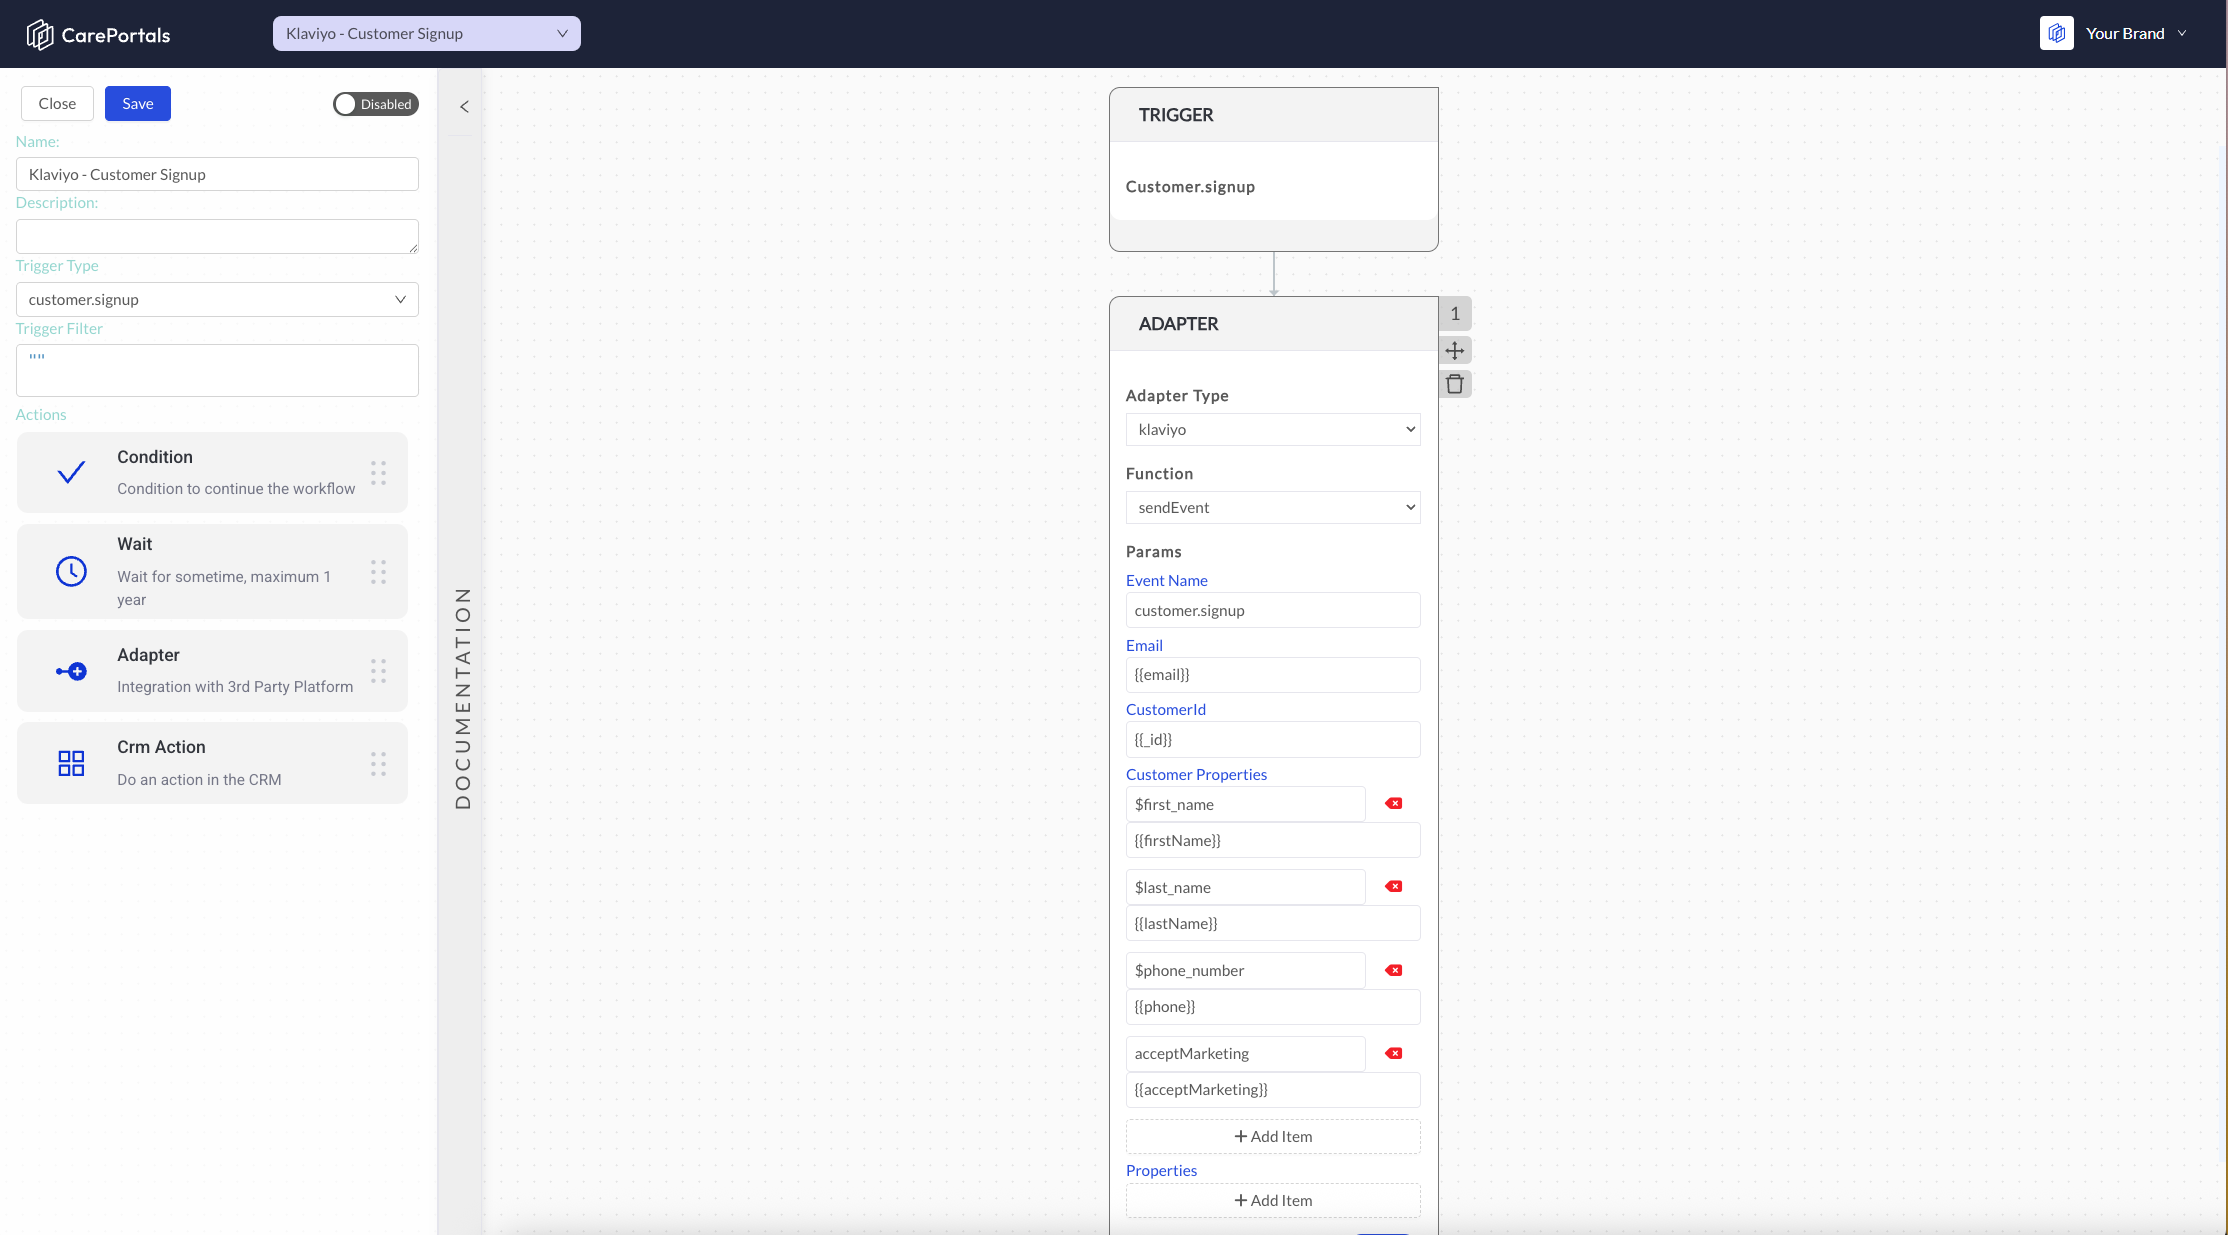
4. Configure Parameters
Map the data fields from CarePortals to the corresponding fields in Klaviyo. This ensures the right information is sent with the event.
Event Name: Enter the name of the event as you want it to appear in Klaviyo (e.g.,
customer.signup).Email: Use the variable
{{email}}to pull the patient's email address.CustomerId: Use the variable
{{_id}}to link the event to the unique user ID.
Need to find specific variable names? Refer to the Customer Data Reference guide. It provides a full list of available properties in the payload, based on selected trigger type, such as dob, gender, and defaultAddress, which you can use to map custom data.
5. Set Customer Properties
You can map standard patient details to Klaviyo's customer profile fields.
firstName: Map this to
{{firstName}}.lastName: Map this to
{{lastName}}.phone or phoneNumber: Map this to
{{phone}}acceptMarketing: Map this to
{{acceptMarketing}}.
For Klaviyo workflows, use the Adapter’s ‘sendEvent’ function with the field key ‘phone’, and use ‘phoneNumber’ with the ‘subscribeToList’ function.
6. Add Custom Properties
If you need to send additional data that does not fit into the standard fields, you can use the Properties section at the bottom of the adapter configuration.
Click + Add Item to define custom key-value pairs that are relevant to your specific marketing campaigns.
Need help or have questions? Reach out at support@portals.care, or head to our Support Centre to submit a ticket.
Next Steps
Now that you have set up the Klaviyo integration, you can explore these related guides to further automate your operations.
Workflow Events/Triggers: View the complete list of events available in CarePortals.
The Workflow Automation Engine: Learn more about how triggers, conditions, and actions work together to automate your platform.
Use Case: Add a New Patient to a HubSpot List Workflow: See an example of adding a new patient to a contact/lead list in HubSpot as soon as they create an account on CarePortals.