How to Create a Coupon
Coupons are a powerful way to boost sales, attract new patients, and keep loyal ones coming back. From welcome discounts to exclusive offers, CarePortals gives you full control over how and when coupons are applied, right from the CRM portal.
Create tailored promotions that align with your marketing goals using conditions, usage limits, and advanced targeting.
Key Coupon Features
Before you begin, here is what you can do with coupons:
Target specific patients: You can make coupons available to everyone or limit them to certain individuals. This is useful for running targeted campaigns or rewarding loyal patients.
Apply to specific products: Set up coupons that apply to your entire store or only to certain products and categories.
Set usage limits: Control how many times a coupon can be used in total. You can also restrict it to the patient’s first order to drive initial conversion.
Subscriptions Cycles: Apply coupons to recurring orders with full flexibility. Limit them to a specific number of billing cycles or extend them throughout the entire subscription duration.
How to Create a Coupon
The following guide will walk you through the steps to create your first coupon.
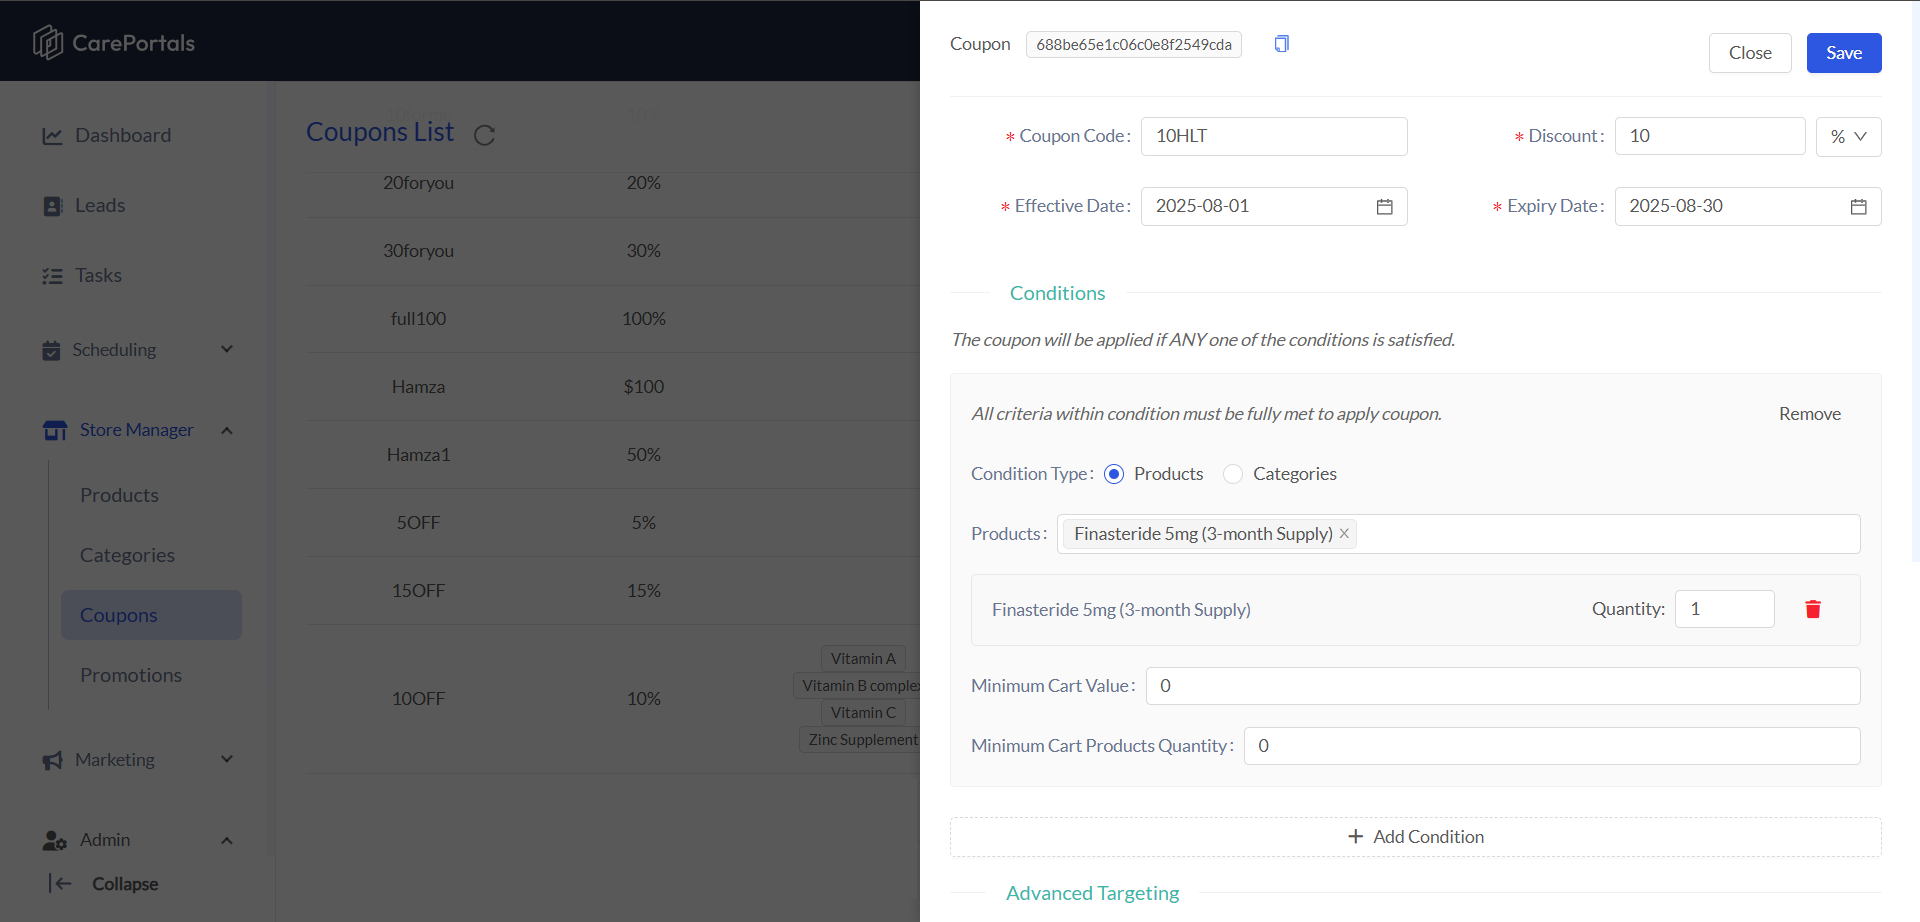
Step 1: Establish the Coupon's Core Details
Start by defining the fundamental aspects of your coupon. Set a unique code for patients to enter, specify the discount it provides, and determine the dates it will be active. These details form the foundation of your promotion and must be configured first.
Navigate to the Store Manager > Coupons section of your CRM portal and click the Create Coupon button.
In the form that appears, enter a unique Coupon Code. This is the code patients will use at checkout (e.g.,
5OFF).Enter the Discount value. This can be a percentage (e.g., 5%) or a fixed amount (e.g., 50$).
Set an Effective Date and an Expiry Date using the calendar pop-ups. This determines the promotional period during which the coupon will be valid.
⚠️ Coupon Code Restrictions:
To ensure compatibility across all browsers and platforms, coupon codes should only include letters, numbers, dashes (`-`), and underscores (`_`). Special characters like %, $, @, &, and ! are not supported and may cause errors during checkout.
Step 2: Define the Conditions for Use
Next, set the rules that a patient's order must meet to qualify for the discount.
Under the Conditions section, choose the Condition Type:
Products: Base the condition on the purchase of specific items. Search for and select the product(s) (e.g., Finasteride) and set the minimum Quantity required in the cart.
Categories: Base the condition on the purchase of items from a certain category (e.g., Hair Loss Treatments).
You can also set a Minimum Cart Value or Minimum Cart Products Quantity that must be met for the coupon to apply.
Click + Add Condition to create multiple qualifying rules. For example, a patient could qualify by either buying a "3-Month Supply of Finasteride" or any single item from the "Weight Management Medications" category.
To learn how to correctly use the Conditions logic, refer to the How Conditions Work section of this guide.
Step 3: Apply Advanced Targeting and Finalize
Advanced targeting allows you to refine who can use the coupon and which items in their cart receive the discount. This is where you can tailor the promotion to specific patients groups or products.
In the Advanced Targeting section, you can specify Affected Products or Targeted Categories. This ensures the discount applies only to certain items, even if the entire cart met the initial conditions.
Subscription Products
If you select a subscription product as the Affected Product, a new field called Cycles will automatically appear. Here, you can define the number of cycles for which the discount will be applied (0 = unlimited cycles).
*Only one subscription product is supported per coupon.
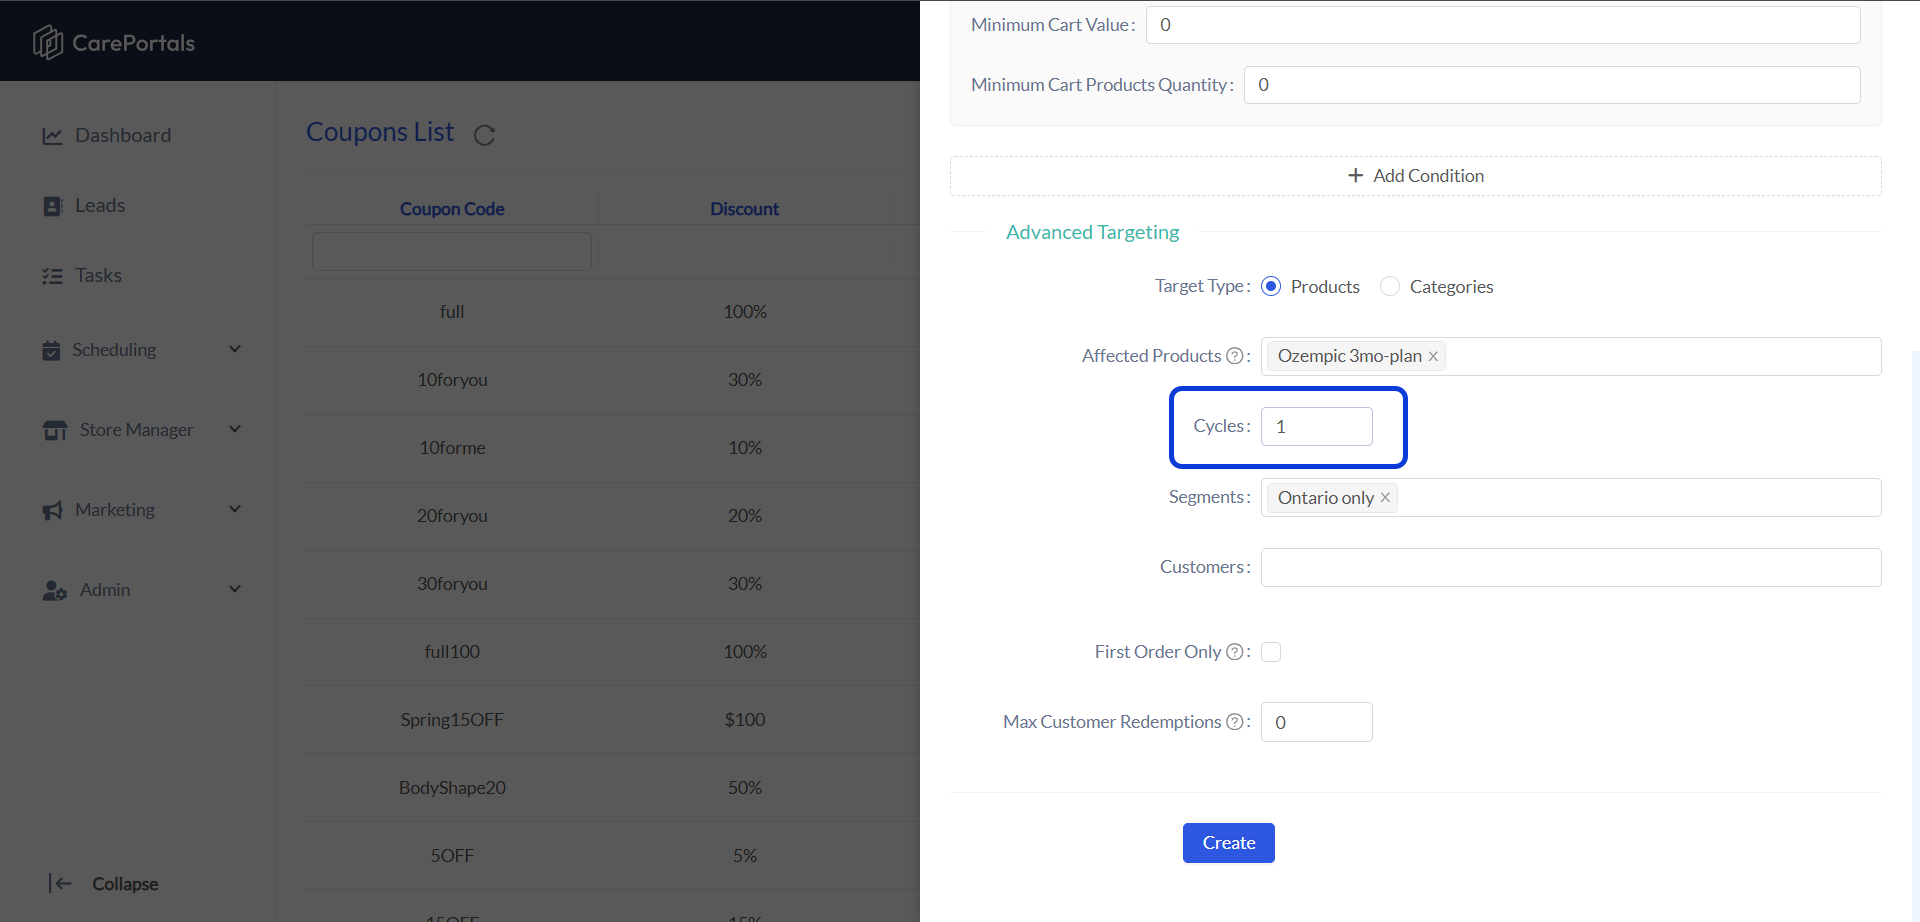
Use the Customers and Segments fields to limit the coupon to specific individuals (e.g., 'Dan Hendria') or to pre-defined customer groups (e.g., 'State-specific Customers').
Check the First Order Only box to restrict the offer to the first purchase of a patient (i.e, new patients only).
Set a limit on Max Customer Redemptions to control how many patients can use the coupon. Zero (0) means unlimited patients.
Once you have configured all your settings, click the Create button to save and activate your new coupon. It will now appear in your coupons list, ready to be shared with your patients.

How Segments and Customers Work Together
When you apply a coupon to both a specific customer and a segment, they are considered independently. The system uses OR logic, meaning a customer will be eligible for the discount if they meet either condition.
For example, if you target the customer 'Dan Hendria' and the segment 'Texas Customers', the coupon will apply to:
Dan Hendria (regardless of whether he is in the 'Texas Customers' segment).
Any customer who is part of the 'Texas Customers' segment.
Understanding Coupon Conditions
The power of coupon conditions comes from a two-level logic system that combines AND and OR rules. Here’s how to understand it:
Level 1: Inside a Condition Group (The AND Rule)
Think of a single condition group (the box containing fields like 'Products', 'Minimum Cart Value', etc.) as a checklist. All criteria within a single group must be true.
For the group to be considered "satisfied," the customer's cart must meet every single criterion you set within it. Here’s an example:
If you set Category to ‘Hair Loss Treatments’
ANDMinimum Cart Value is ‘$100’, a patient must have a product from your Hair Loss Treatments category in their cartANDspend at least $100 for the coupon to be applied successfully.
Level 2: Between Multiple Condition Groups (The OR Rule)
You can create multiple condition groups to give your coupon more flexibility. When using this setup, the coupon will apply if ANY of the condition groups is met. The patient’s cart only needs to match the conditions in one group, not all.
Let's say you want to design a promotion that rewards:
Those investing in a specific treatment plan
ORThose purchasing several items at once.
To accomplish this, you can set up two condition groups:
Group 1: Category is ‘Weight Management Medications’
Group 2: Minimum Cart Products Quantity is ‘3’.
With this setup, the coupon will apply if either group’s conditions are satisfied.
Next Steps
Now that you know how to create a Coupon, you may want to explore these related articles.
Understanding Promotions vs Coupons: Learn the key differences between these features.
How to Create a Product (One Time and Subscription): A guide to setting up products for both single purchases and recurring subscriptions.