How to Configure a Workflow Trigger Filter
A trigger is the specific event that starts your workflow. For example, a workflow can be triggered when an order is created or when a subscription is updated.
By applying a trigger filter, you can ensure the workflow only runs under the right circumstances. The filter instructs the workflow to execute only when specific conditions in the trigger's data are met. This guide uses a practical scenario to explain how to set up a workflow with a trigger filter.
Understanding Triggers, Filters, and Payloads
Before adding a filter, it’s helpful to understand these key concepts:
Triggers: Every workflow starts with a trigger. Triggers follow a
resource.actionformat, such asorder.createdorsubscription.cancelled. The resource is the object (like an Order), and the action is the event (like Created).Payload: A payload is the set of data associated with a trigger event. For an
order.createdtrigger, the payload contains all the information about that specific order, including product details, shipping address, and total price. The filter checks this data to decide if the workflow should run.Filters: MongoDB-style expressions that evaluate payload data. The workflow runs only if all the established filter conditions are true (for example, ensure
totalAmountis not 0).
Use Case: Track Paid Subscription Renewals
Let's say you want to track subscription renewals with a third-party analytics platform, such as Everflow. You need to run a workflow when a paid order is processed as part of a subscription. This means ignoring both the initial purchase and any free renewals.
In this scenario, we'll walk you through how to configure a filter that achieves this goal.
Step 1: Select the Trigger
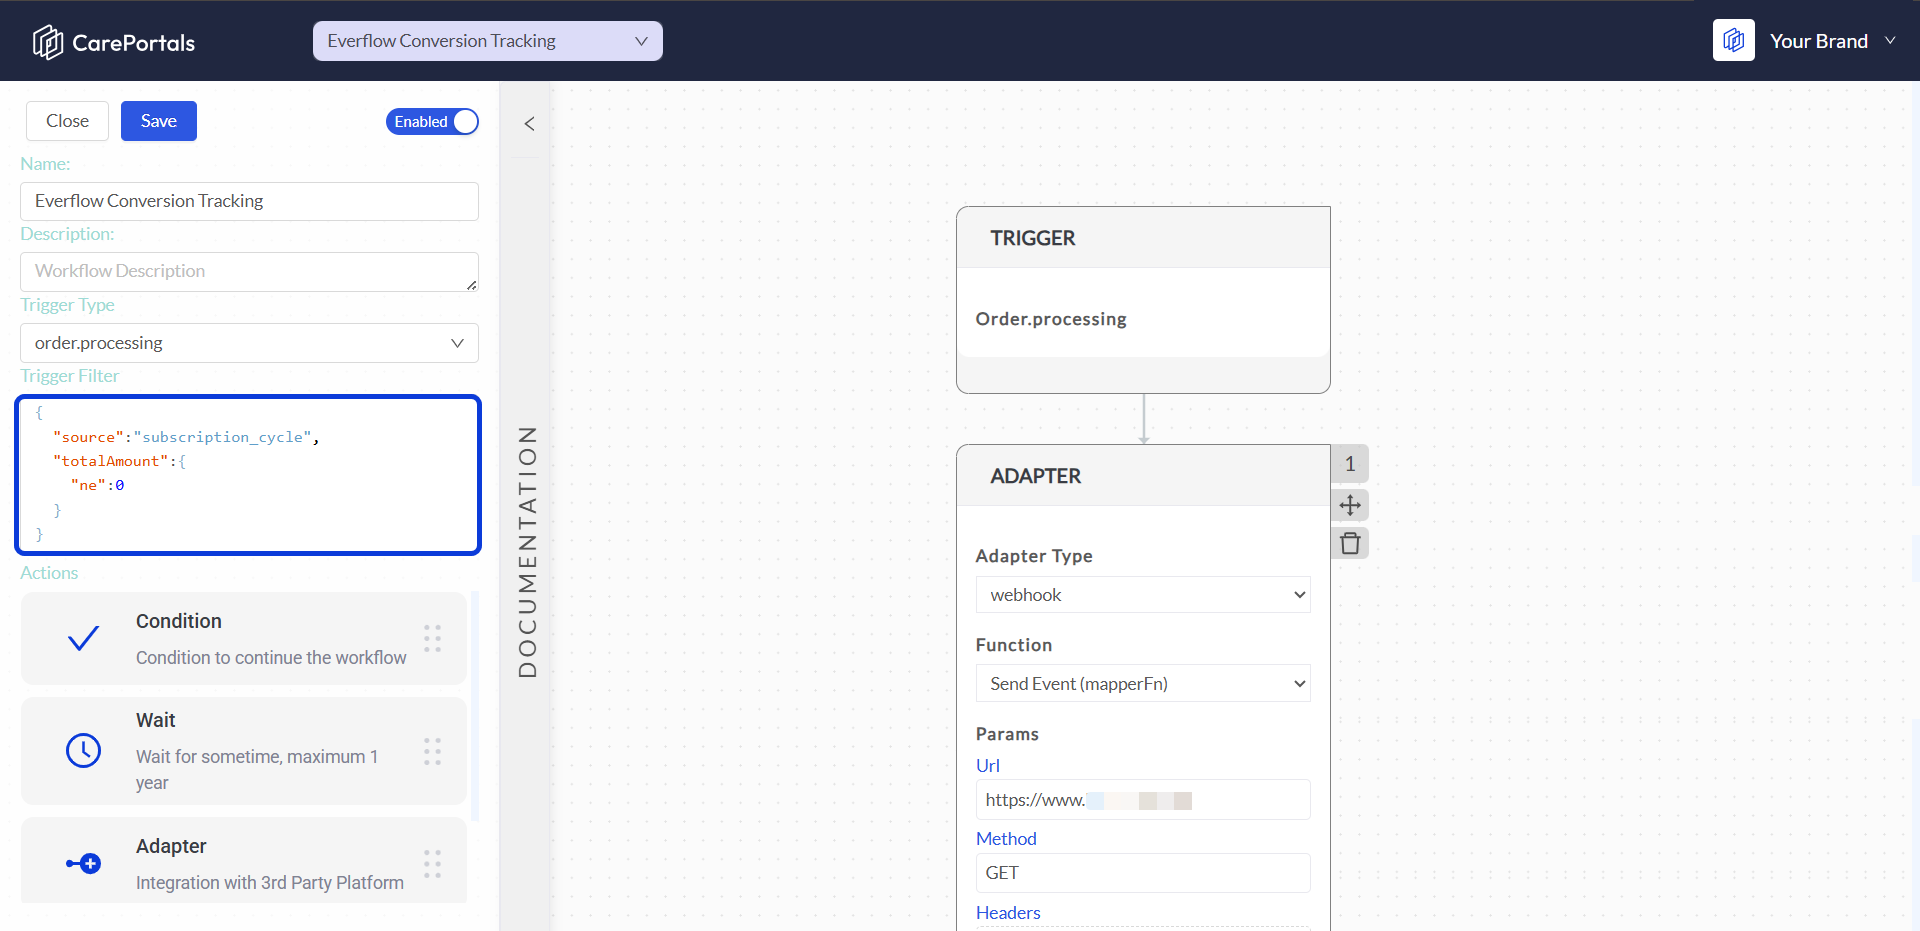
First, select the order.processing trigger. This ensures the workflow starts after the payment for an order has been successfully processed.
Step 2: Define the Filter Logic
The Trigger Filter uses MongoDB query language to evaluate multiple conditions simultaneously. In this scenario, we need to verify two conditions: that the order source is a subscription renewal AND that the order total is greater than zero.
Enter the following logic into the Trigger Filter field:
{
  "source": "subscription_cycle",
  "totalAmount": {
    "$ne": 0
  }
}
This filter sets two conditions that must BOTH be true for the workflow to run:
"source": "subscription_cycle": This condition checks whether the order’s source is'subscription_cycle'. It performs a simple equality check, effectively filtering out initial checkouts, one-time purchases, or manual orders."totalAmount": { "$ne": 0 }: This condition uses the$ne(not equal to) operator to ensure the order'stotalAmountis not zero. This filters out any free or zero-dollar renewal cycles of a subscription.
Need a refresher on operators? See the Workflow Triggers page for a list of common filter operators.
Step 3: Add the Webhook
After the trigger is configured, the next step in this workflow is to add an Adapter > Webhook. It’s the action step responsible for sending the filtered order data to Everflow with the needed properties, which can be configured under the Query Params section of the Adapter settings.
To learn more about how to configure Adapters, please refer to the How to Use Adapters guide.
Next Steps
Now that you understand how to configure a trigger with a filter, here are a few articles that can help you continue building workflows:
How to Build a Workflow to Send an Email: This tutorial provides a comprehensive, step-by-step walkthrough of creating a simple workflow from start to finish, demonstrating how to combine a trigger with other action steps.
How to Use CRM Actions: Learn how to use internal actions in your workflow, such as sending an email or updating a patient's record.
Trigger Events Payload Index: This reference section provides a complete list of all trigger data payloads. This is essential for finding the correct paths needed to create your own custom filters.