How to Use Conditions
The Condition step in your workflow acts as a decision point. Think of it as an if-then-else statement for your automation.
It checks if certain rules are true or false and directs the workflow based on the outcome. This allows you to create dynamic and intelligent automations that respond differently to various situations.
For example, you can use a Condition step to check if an order's status is Awaiting Payment before sending a payment reminder email.
Configure a Condition
The Condition step has three main parts you can configure, Condition Logic, Context Path, and If False, Go To.
Condition Logic
This is where you define the rule that the workflow will check. The rule must be written in JSON format. You will use operators to compare a field's value against the criteria you set.
For example, the condition {"status":{"$nin":["cancelled","no-show","closed"]}} checks if the status of an order is not cancelled, no-show, or closed.
To learn more about operators, check the Workflow Filters page.
Context Path
The Context Path is an optional field that tells the Condition step where to find the data it needs to check. This is useful when the information is not part of the original trigger but is instead the result of a previous step in the workflow, like a CRM Action.
Leave it blank to check data from the workflow's original trigger payload.
Provide a path to check the result of a previous step. The path is typically
history.<step_number>.result, where<step_number>is the number of the step whose output you want to inspect.
If False, Go To
This field determines what happens if the condition is false. You can:
Jump to another step: You can enter the number of another step in the workflow. The workflow will then jump to that step and continue. Each step's number is visible in its top right corner.
End the workflow: If you leave this field blank, the workflow will simply stop if the condition is false. The placeholder text
Exitshows this is the default action.
graph TD
    subgraph "Workflow Logic"
        A(Trigger or Previous Step) --> B{Condition: Check Rule};
        B -- "If True" --> C[Continue to Next Step...];
        B -- "If False" --> D{"If False, Go To"};
        D -- "Jump to Step" --> E(Jump to another step);
        D -- "Exit (Default)" --> F([End Workflow]);
    end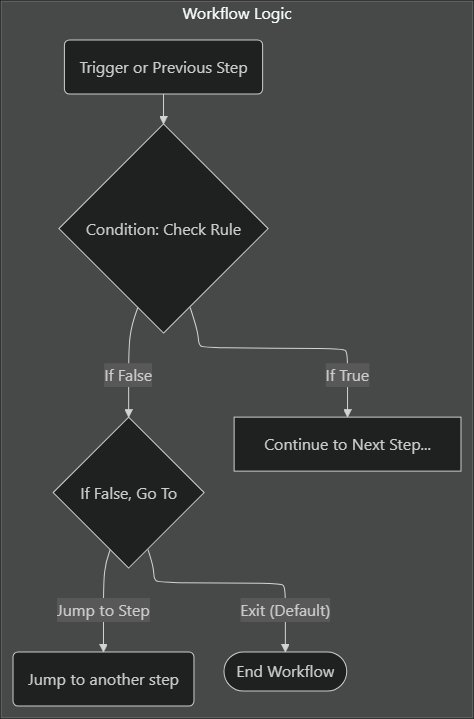
Operators
You can use different operators to build your condition logic. Here are the most common ones.
For a list of more advanced operators, go to the Ops section of this link.
Comparison Operators
These operators compare a field to a specific value.
Logical Operators
These operators allow you to combine multiple expressions into a single rule.
Example Scenarios
Here are some examples of how you can use the Condition step in your workflows.
Check if a Requirement is Pending
Let's say a previous step (Step 2) in your workflow is a CRM Action that checks if a patient has any incomplete requirements. That action produces a true or false result. You can use a Condition step to check that result and send a reminder email if requirements are still pending.
Condition:
{"result":true}Context Path:
history.2If False, Go To:
If you leave this field blank, the workflow will automatically exit when the condition is false, it uses "Exit" as the default behavior.
Alternatively, you can choose any other step from the workflow to continue processing when the condition is false (e.g.,
5).

Create a DoseSpot Patient if One Does Not Exist
Let’s say you want to check if a patient record already exists in a third-party partner system before creating a new one. In this case, the workflow is checking for a patient ID from DoseSpot, a partner platform for ePrescribing that allows your medical team to send prescriptions electronically.
The workflow first uses a CRM Action, Find One, to search for the patient's record within CarePortals. The Condition step then inspects that record to see if it already contains an ID from DoseSpot. The condition looks inside the result of the first step for a specific field (dosespotId) within the extras data. If that field is missing, the workflow can proceed to create the patient record in DoseSpot.
Condition:
{"history.1.result.extras.dosespotId":{"$exists":false}}Context Path: Leave it blank for this example.
If False, Go To: Leave it blank to use the default option “Exit”. The workflow will stop in case of a false condition (which means that a DoseSpot ID already exists).
If this condition is true, the workflow continues to the next step, which is added as an Adapter. This Adapter is configured to connect to the DoseSpot platform and create a new patient record. To learn more about adapters, please see the How to Use Adapters article.
We’ve created the Send a Prescription Order to a Pharmacy via Lifefile Workflow article to show exactly how multiple workflow steps work together to automate a real-life process. Check it out to get a deeper understanding of how Triggers, Adapters, and Conditions interact in practice.

Related Articles
Now that you understand what Conditions are and how they can be set, you may want to explore the following pages.
How to Use Adapters: Connect your workflow to external services and perform specific actions.
How to Use CRM Actions: Configure your workflow to automatically send messages, update CRM records, and more.
How to Use the Wait Component: Add delays to control when actions happen within a workflow.